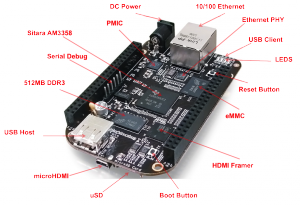
The BeagleBone Black is the youngest member of the BeagleBone family and is powered by a CortexTM Sitara AM335x ARM A8 from Texas Instruments, is clocked at 1 GHz and has appeared as competitors to the Raspberry Pi.
Other specifications :
- 512MB DDR3 RAM
- 8-bit 2GB eMMC on-board flash storage
- 3D graphics accelerator
- NEON floating-point accelerator
I decided to use the BeagleBone Black as my little web server, because it has more power and the PHP pages of WordPress or ownCloud run much smoother than on a Raspberry PI.
The BeagleBone Black is delivered with a preinstalled Angstrom Linux, but since I'm used to Debian for years now, I wanted to have it on my BeagleBone.
So in order to install Debian or Ubuntu on the BlackBerry, you need a micro SD card with at least 2 GB. Although the BeagleBone Black has a built-in flash memory you still have to go the indirect way with the SD-card, because the internal memory of the Beaglebone Black can't be flashed directly via USB.
So first download the image, that has to be installed on the BlackBerry.
You can find the Debian images here.
The Ubuntu Images are here
After the download the file needs to be decompressed. If no unpacking program comes up after clicking the file, this has to be done from the console. Use the command
xz -d BBB-eMMC-flasher-debian-versionnumber.xzor
xz -d BBB-eMMC-flasher-ubuntu-versionnumber.xzIf an error occurs because the xz-command is not known, the program needs to be installed with
apt-get install xz-utilsThen the file can be unpacked as described above.
The result will be the file
BBB-eMMC-flasher-debian-versionsnummer.img
or for Ubuntu
BBB-eMMC-flasher-ubuntu-versionsnummer.img
Now the image needs to be written to the micro-SD-card. But after inserting the card you first have to find out under which device name the SD-card is listed.
This can be done with the command
fdisk-l With this command all connected hard-disks, USB-devices and SD-cards are listed.
root@Aspire # fdisk-l
Disk / dev / sda : 320.1 GB, 320072933376 bytes
255 heads, 63 sectors / track , 38913 cylinders, total 625142448 sectors
Units = sectors of 1 * 512 = 512 bytes
Sector size (logical / physical ) : 512 bytes / 512 bytes
I / O size ( minimum / optimal) : 512 bytes / 512 bytes
Disk ID: 0x957b9a51

Disk / dev / sdb : 7948 MB, 7948206080 bytes
4 heads, 16 sectors / track , 242560 cylinders, total 15523840 sectors
Units = sectors of 1 * 512 = 512 bytes
Sector size (logical / physical ) : 512 bytes / 512 bytes
I / O size ( minimum / optimal) : 512 bytes / 512 bytes
Disk ID: 0x000850da
Please be careful, because with the next steps the drive will be completely overwritten
So my SD-card ist listed under /dev/sdb
Remove all possibly mounted partitions of the the SD card with
 root @ Aspire # umount /dev/sdb*
umount : /dev/ sdb is not mounted
umount : /dev/sdb1 is not mounted
umount : /dev/sdb2 is not mounted
Now the image can be written to the SD card. To do this use the command:
dd if=BBB-eMMC-flasher-debian-versionsnummer.img bs=1024 of=/dev/sdx
Instead of /dev/sdx use the drive that was detected bevore on your computer.
This will take some time, but if that is done, the worst is actually already over.
The SD card can now be removed from the computer. To flash now the operating system on the BeagleBone Black, the power needs to be unplugged bevore.
Then insert the SD-card with light pressure into the card-slot of the Beaglebone Black until it clicks and locks into place.
Before we provide the BeagleBone again with power, the boot button must be pressed, which is located just above the SD card slot (see picture below). This causes the BeagleBone not to boot from its internal flash memory, but from the inserted SD card.

So push the boot-button, then connect the BeagleBone to the power and hold the button until the LEDs start to light up.
Now the following happens: from the SD-card boots a minimal Linux and writes the new operating system to the internal flash memory of the BeagleBone.
This will take about 5-10 minutes. If all four LEDs are lit, the flash process is complete.
Now unplug the BeagleBone from the power again, remove the SD card .. and if all went well, the selected operating system should now start and you are ready.
To log in the new installed system there is already a default user established. User debian with password debian for Debian or user ubuntu with password ubuntu for Ubuntu.
After installing the correct time zone on the BeagleBone needs to be set. How this is done is described here: Set timezone
additionally the correct character set for the respective country must be set. The instructions for this are here
Add comment