This requires a LEMP installation, as described here: Nginx, MySQL and PHP
This manual is written for an banana Pi, but it should also work for a Raspberry Pi or Beaglebone Black.
Step 1: Set up Nginx with SSL
These create the directory /etc/ssl/nginx, change to the directory and create a self-signed certificate.
mkdir /etc/ssl
mkdir /etc/ssl/nginx
cd /etc/ssl/nginx
openssl genrsa -out privkey.pem 2048
openssl req -new -x509 -key privkey.pem -out cacert.pem -days 1095
Step 2: Set up Database for OwnCloud
For that start MySQL in the console
mysql -u root -p
and then create the user "user" with password "password". Then create the database "owncloud" and transfer all rights to the user "user".
CREATE USER 'user'@'localhost' IDENTIFIED BY 'password';
CREATE DATABASE IF NOT EXISTS owncloud;
GRANT ALL PRIVILEGES ON owncloud.* TO 'user'@'localhost' IDENTIFIED BY 'password';
Quit MySQL with
quit
Step 3: Install additional packages
Required packages for ownCloud are:
apt-get install php5-gd php5-json php5-curl php5-intl php5-mcrypt php-xml-parser
Additionally we need
apt-get install bzip2
Step 4: (optional) create a document-root for secure sites
For this you create a new folder, depending on your preference, in /srv/ or /var/. For example /srv/secure or /var/secure.
Step 5: Load and install OwnCloud
For this change to the newly created directory for protected Web sites (eg cd /var/secure) and download the OwnCloud Package with
wget https://download.owncloud.org/community/owncloud-7.0.3.tar.bz2
Then unzip the package with
tar -jxvf ownCloud 7.0.3.tar.bz2
Then the rights to the newly created folder must be set so that nginx can write to the folder. For this purpose, enter the command
chown -R www-data:www-data /srv/secure
or
chown -R www-data:www-data /var/secure
.
Step 6: Adjust php.ini
PHP is configured so that only files can be uploaded with a maximum size of 2MB. That is not enough in most cases. In order to increase this value, the parameter upload_max_filesize and post_max_size in the php.ini file needs to be adjusted, for example to 1GB.
nano /etc/php5/fpm/php.ini
[....]
upload_max_filesize = 1024M
[....]
post_max_size = 1024M
Step 7: Configure nginx
For that a new server block or virtual server is defined by creating a new file in the folder /etc/nginx/sites-available, for example, ssl-default.
nano /etc/nginx/sites-available/ssl-default
The following configuration worked for me:
upstream php-handler {
    # server 127.0.0.1:9000;
    server unix:/var/run/php5-fpm.sock;
}

server {
	listen 443;

	ssl on;
	ssl_certificate /etc/ssl/nginx/cacert.pem;	# path to your cacert.pem
	ssl_certificate_key /etc/ssl/nginx/privkey.pem;	# path to your privkey.pem

	root /srv/secure;

	client_max_body_size 1G; # set max upload size
	fastcgi_buffers 64 4K;

	rewrite ^/caldav(.*)$ /remote.php/caldav$1 redirect;
	rewrite ^/carddav(.*)$ /remote.php/carddav$1 redirect;
	rewrite ^/webdav(.*)$ /remote.php/webdav$1 redirect;

	index index.php;
	error_page 403 /core/templates/403.php;
	error_page 404 /core/templates/404.php;

	location = /robots.txt {
		allow all;
		log_not_found off;
		access_log off;
	}

    location ~ ^/(data|config|\.ht|db_structure\.xml|README) {
    	deny all;
    }

    location / {
		# The following 2 rules are only needed with webfinger
		rewrite ^/.well-known/host-meta /public.php?service=host-meta last;
		rewrite ^/.well-known/host-meta.json /public.php?service=host-meta-json last;

		rewrite ^/.well-known/carddav /remote.php/carddav/ redirect;
		rewrite ^/.well-known/caldav /remote.php/caldav/ redirect;

		rewrite ^(/core/doc/[^\/]+/)$ $1/index.html;

		try_files $uri $uri/ index.php;
    }

    location ~ ^(.+?\.php)(/.*)?$ {
        try_files $1 =404;

        include fastcgi_params;
        fastcgi_param SCRIPT_FILENAME $document_root$1;
        fastcgi_param PATH_INFO $2;
        fastcgi_param HTTPS on;
        fastcgi_pass php-handler;
    }

    # Optional: set long EXPIRES header on static assets
    location ~* ^.+\.(jpg|jpeg|gif|bmp|ico|png|css|js|swf)$ {
        expires 30d;
        # Optional: Don't log access to assets
        access_log off;
    }
}
The new virtual host is activated by a symbolic link in the /etc/nginx/sites-enabled.
ln -s /etc/nginx/sites-available/ssl-default /etc/nginx/sites-enabled
Then restart PHP-FPM and nginx with
/etc/init.d/php5-fpm restart
/etc/init.d/nginx restart
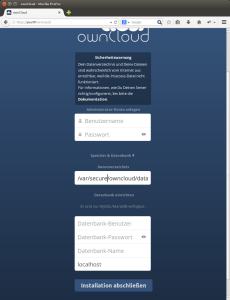
Now you can log on the server at https://yourIP/ownCloud and complete the installation.
A site appears where you can create an administrator account. Then the location for the files can be selected - default is here /var/secure/ownCloud/data. If there is enough space, you can apply the setting. The warning, that this folder is not safe because .htaccess is not working properly, can be ignored because nginx is running and the "data" folder is disabled for access in the configuration.
Then enter username, password and the name of the database created above and that's it.
OwnCloud is installed!

Add comment