In most cases, it is also advisable to install a Mail Transfer Agent (MTA) on your server to enable him to send mails itself.
Why is this useful?
- The system sends a warning or critical states in an email to the user root.
- software like Wordpress send emails when a problem has occurred
- If you want to use the "forgot password" function in WordPress or Seafile, this is done via E-Mail
However, you should be very careful with the configuration so that the own server is not abused by spammers.
But it is not that easy to send mail from a server without a fixed IP, because for spam protection most providers won't accept any mail that is sent directly by such machines.
But there is a nice way to get around that. It sends its mail through the SMTP server of your own mail-provider, such as Google Mail or Web.de.
As MTA now Postfix is standard because unlike Sendmail it is relatively easy to configure.
I will describe how to configure Postfix with Gmail as SMTP-relay - that has worked for me right away. But that also should work with some adjustments with other providers.
First the necessary software is installed:
apt-get install postfix libsasl2-modules bsd-mailx
The program bsd-mailx makes it possible to create and send mail from the command line. This function is used by many programs, so it should be installed.
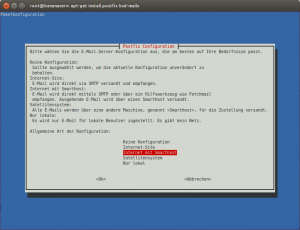
After the software is installed, you get into the setup of Postfix. In the first dialog, the basic configuration of Postfix is set. So if you do not own your own domain with a fixed IP address, choose "Internet with smarthost" here.
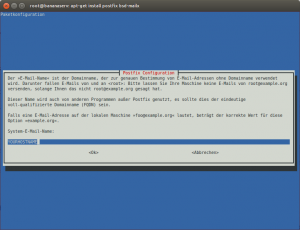
In the next dialog the mailname must be entered. There is added the hostname by default, which is normally the right choice.

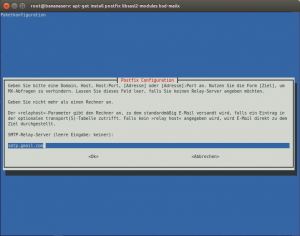
In the third dialog the SMTP-relay must be entered. This is the SMTP address of the provider you want to use. In this case, it is "smtp.gmail.com". If you don't know the SMTP address of your provider, you can find a fairly detailed list of providers here strong >.
Now the basic configuration is completed. However, some manual work is still needed to get the thing up and running.
First, the file /etc/postfix/main.cf must be edited. So open the file and add the following lines:
root@bananapi# nano /etc/postfix/main.cf

smtp_sasl_auth_enable = yes
# noplaintext weglassen, wenn Passwörter im Klartext übertragen werden müssen:
# (nicht empfohlen, nur wenn's anders nicht funktioniert)
smtp_sasl_security_options = noanonymous
smtp_sasl_password_maps = hash:/etc/postfix/sasl_password

# verschluesselung einschalten
smtp_tls_security_level = may
As a result, authentication via SASL (Simple Authentication and Security Layer) is turned on and configured.
In addition, the encryption for TLS (Transport Layer Security) is turned on.
Now the file /etc/postfix/sasl_password is created. There the username and password for authentication for your mail provider are entered - in this case, it is Google Mail
root@bananapi# nano /etc/postfix/sasl_password

smtp.gmail.com YourUsername:YourPasswort
To protect the file from abuse use
root@bananapi# chmod 600 /etc/postfix/sasl_password
, so that it is only readable for the root-user.
Now the Postfix-lookup-table must be created. This is done with the command
root@bananapi# postmap hash:/etc/postfix/sasl_password
After that restart Postfix, so that the new configuration is accepted.
root@bananapi# /etc/init.d/postfix restart
Now postfix should be able to send mail through your mail acount. To test this, we can send a first test mail from the command line:
root@bananapi# echo "First Testmail from Server" | mail -s"Testmail" yourmailAddress@example.com
If this email then lands in your mailbox after some time, it's done! The server is now able to send notification emails!
Now only one thing is left to do: by default, system messages are sent locally to the address root@yourserverhostname. So for not storing these mails locally, but sent them to an external address, edit the file /etc/aliases and add the following line:
root: your@mailaddress.com
In order for the changes to take effect, the following command must be executed:
root@bananapi# newaliases
From now on the system messages from your server will be sent to your email address!!


Add comment